I wished to combine the scarf joint to modern materials and have build SCARF FERRULE, a scarf joint with a shrink tube (plastic) ferrule. In that structure no ropes are needed. The ferrule is quite light. Is is ready in 10 minutes! It can easily be made to a Quad or Penta rod where traditional round ferrules are likely to be over-sized and even clumsy. I have used this type of ferrule now for one summer both in one hand trout and in two hand Spey bamboo rods and the experiences are good enough to be written here. The pictures here are from a ferrule made to a quad cane strip, not a real rod.
MODIFICATION OF THE TAPER
PLANING THE SCARF JOINT
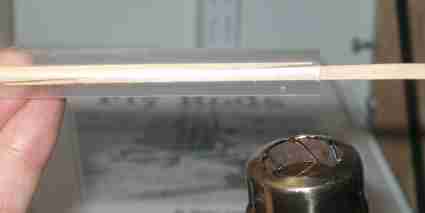
THE SHRINK TUBE
Shrinking tubes are used in electric installations. Tubes are of several
thickness, color, strength etc. Some of those have glue in inner surface.
Some are used outdoor and are UV-resistant (very important for this
purpose). The material is easily shrinked with heat (using a heat-gun).
I have made the inner layer of the ferrule with a translucent shrink tube without glue.
Put the sections together. Heat the shrink tube carefully starting from
the butt end and let the tube shrink around the joint. When the tube has cooled a
little pull the sections apart. The wax on the butt section helps a lot. Heat only some centimeters then pull apart wait for some cooling and repeat. If you try to shrink it with total length the tube may be jammed.
Now you have a translucent but a little weak scarf joint ferrule ready.
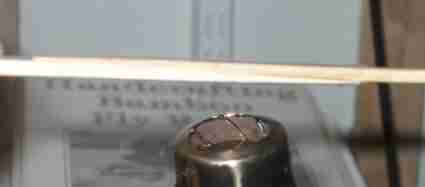
You need something to strenghten and cover it.
I have used a second layer of stronger black
shrink tube with hotglue inside (Novatio). Cut a little (0.5", 1 cm) longer piece.
Put the sections together and the second tube on its place. Now again heat
with the heat-gun, let cool down and pull apart. The ferrule is almost ready.
If you have a two-tip rod make the second tip same way.
Another method which I use today is to tie some thread (e.g. to fix line guides, silk) as a circular spiral wrapping on the tube. You may put some drops of cyanoglue on the thread. Then simply shrink another clear / transparent tube on the joint and you have a firm transparent shrink tube ferule.
I have used paraffin (candle wax) to the joint when fishing. I have not used any tape or
other extra to secure the joint and have not had any failures with 1:14 - :20 ratio of skewness in one-hand rods.
If your ferrule is loosening during casting you may put a 2 cm piece of elastic (vinyl, silicone) tube on the edge of the shrink tube to ascertain and fix the joint. It is also possible to "lock" the tube using a separate "ring" or "bulge" wrapped with the treahd some millimeters outside the lower tube. Then let the second tube go over the bulge and shink it to make a tight "lock" for the ferrule.
To make the scarf ferrule joint firm enough you have to add a little to the
thickness of the taper at the joint area. I have added 0.01" (0.25 mm) to
each strip to the last 6-8" (12-20 cm) of the sections. This increases the
taper with 0.02"(0,5 mm). I have seen an old salmon rod with an increase of
1 mm (0.04") on the joint area. This decreases the bending of the ferrule (see the last picture).
You also have to add about 5" (10 cm, half of the joint length) to the length of the sections because the skew scarf joint
decreases the real length of the rod with this amount.
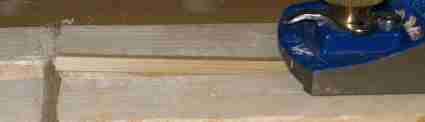
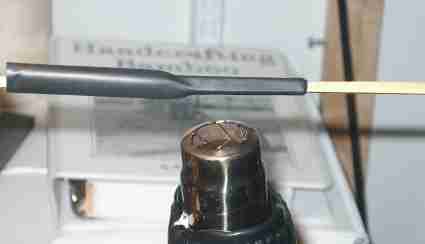
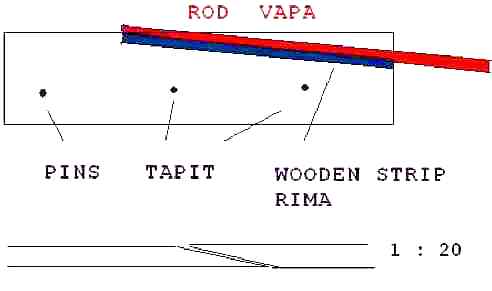 I have made a very simple planing form for the planing. It consists of two
wooden boards connected with three metal pins. There is a wooden strip
between the boards. The rod section is put laying on the strip between the boards
and the strip thus supports the rod section all the way between the boards.
There is a cane pin to fix the tip of the wooden strip near to the surface
of the form. The form is pressed between the jaws of the working bench.The
end of the sections of the rod are planed (or sanded). I have used a 1: 20 ratio,
skewness of the joint surface. If the thickness of the rod is 0.2" (5 mm) the length of the joint is about 3,5" (9cm)
and the tip is about 0.04" (1 mm).
I have made a very simple planing form for the planing. It consists of two
wooden boards connected with three metal pins. There is a wooden strip
between the boards. The rod section is put laying on the strip between the boards
and the strip thus supports the rod section all the way between the boards.
There is a cane pin to fix the tip of the wooden strip near to the surface
of the form. The form is pressed between the jaws of the working bench.The
end of the sections of the rod are planed (or sanded). I have used a 1: 20 ratio,
skewness of the joint surface. If the thickness of the rod is 0.2" (5 mm) the length of the joint is about 3,5" (9cm)
and the tip is about 0.04" (1 mm).
I have put some cyanoglue (superglue, Loctite) to the planed surfaces of the cane to make it more water resistant.
The tube ferrule is put on the base of the tip section. Cut the tube to the length of the planed
area +1" (2,5 cm). Use paraffin (candle) wax to the butt section to let it
leave the joint after heating. You may put some small drops of glue
(hotglue, fast set epoxy) between the tube and the tip section (not to butt section!)
to fix it better, but this is not necessary.
INNER LAYER OF THE FERRULE
OUTSIDE (SECOND LAYER) OF THE FERRULE
VARNISH AND WRAPPING

The scarf ferrule is elastic!
This certainly affects a little to the function of the rod. The junction area has to be a little
thicker than the rod to inhibit too much bending!
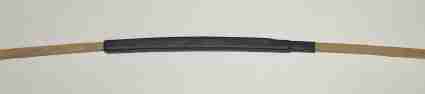
Scarf joint ferrule with black strong shrink tube on a two-tip penta PH Young Driggs River Special and on a penta Waara Spey Rod

A clear transparent two-layer spliced joint ferrule on the triangular rod


BACK TO HOME PAGE